Tags are one of the most powerful and flexible features of Reach, but sometimes to make the most out of tags, you may want to do bulk operations that are not possible from just the Reach app or admin dashboard alone. That is where the Reach API comes in. In this post, we’ll walk through the step-by-step details of how to use the API to import tags. The post is aimed at someone who is generally comfortable using Reach and fairly tech-savvy, but you don’t need to be a professional computer engineer or programmer. Once you’ve seen how approachable the Reach API is, you’ll find lots of other ways to use it, and maybe even ways to use other tools APIs too! It’ll be fun! Let’s dive in.
If you are an engineer who plans to build against the Reach API using your own scaffolding, other languages/libraries, raw cURL, etc, this post will be too simple for you and you’ll probably want to just jump right in with the API Documentation.
Background
What is an API?
“API” stands for “Application Programming Interface”. You can think about it as a way for a computer to use software on another computer. When you use software yourself, you probably sit down at your computer, click your mouse on buttons, use your keyboard to type into form fields, look at the screen to see what’s going on, etc. Well, everything you’re interacting with when using that software is what programers call a “Graphical User Interface” or “GUI”. The GUI is how humans interact with most modern software. The API, on the other hand, is how computers interact with software. So, APIs are designed to be easy for computers to interact with. That means they may not be pretty to look at to the human eye, but they’re precise, they follow consistent rules, they tend to use unique IDs for everything instead of names to avoid confusion, and they expect inputs and provide outputs in a predetermined format.
Of course, your computer needs to be told how to interact with the Reach API and that is where you come in. You’ll be doing some simple setup on your computer, with the help of some files we’ll provide and some third-party software, to show your computer how to use the Reach API. And the way you’ll know how to use the API is from this blog post, but also by referencing our API Documentation at https://api.reach.vote/. Don’t worry if that documentation looks a little intimidating at first – you’ll get the hang of it.
You can read more about general API background all over the internet like here. The specific type of API that Reach provides is known as a “REST API” but that is not too important.
Some key API lingo
Each time your computer interacts with an API, we call that making a “request” to an “endpoint” that the API provides. In return, Reach provides your computer with a “response” containing some data. The request can be one of several “Methods” like “GET”, “POST”, “PUT”, “PATCH”, “DELETE” or more. Each method has different features and capabilities. The requests are directed at a URL corresponding to the endpoint (just like a website address) where the API is set up to accept those incoming requests and respond to them. You can think of this exchange like your computer is requesting that the API do something and then the API is responding accordingly.
In order to interact with the API, your computer needs a “token” which it can get from the API by providing a username and password. This token will only last for 30 minutes before it expires and needs to be refreshed or a new one needs to be fetched.
The API Conversation, a drama in one act
Here is an example conversation between your computer and the API translated into English and dramatized:
Your computer
Hi, Reach API! I want to use you and I have a user name and password that Reach gave me. My username is "a94eb98e-7ed6-4af7-b2d2-38349150ccb5" and my password is "n1HoyJ7aDniZBGeH3U9pY_YIIAx5lc1HvMsklozIHOM"

API
Got it! That Username and Password looks right to me! Here's a token you can use to ask me to do more things in your Reach campaign.

Your computer
Thanks! This token is pretty. Now, please give me a list of all the tags available in this campaign.

API
Sure thing! This campaigns tags include a manual tag called "Volunteer" with the ID "9JVB7YPA", a smart tag called "Young Voter" with the ID "MA2GNNVY", and another inactive manual tag called "Ballot Received" with the ID "XPRQ7NV4".

Your computer
Ok. I'd like to apply that "XPRQ7NV4" tag to a whole bunch of voters. Here's a URL to a file with a long list of all those voters' VAN IDs: https://storage.googleapis.com/campaign-storage-testing/tag%20import%20797507.csv
I know this might take a little while, so can you let me know when you're done? You can use this URL to call me back and let me know: https://webhook.site/e271ce39-8998-4b39-905c-f9d260c4903a

API
Got it. I'll download the file, apply the tags to the right voters, and let you know when I'm done. I'll also let you know if I have any problems along the way. If you're feeling impatient and want to check on things, you can ask me again by mentioning job ID ef71d167-2582-4f6b-9a78-e68e4b9f2bf1.

(25 minutes later)

Your computer
Hey API, how's that import going with job ID ef71d167-2582-4f6b-9a78-e68e4b9f2bf1?

API
Sorry - your token is too old. I can't say anything cuz I don't know if I should trust you.

Your computer
Oops! Sorry. Ok. Please refresh my token. My username is "a94eb98e-7ed6-4af7-b2d2-38349150ccb5" and my password is "n1HoyJ7aDniZBGeH3U9pY_YIIAx5lc1HvMsklozIHOM"

API
Got it. Here's your new token. Try again with it.

Your computer
Ok API, how's that import going with job ID ef71d167-2582-4f6b-9a78-e68e4b9f2bf1?

API
Still in progress! But so far so good!

(10 minutes later)

API
Hey computer! The import you asked me to do is done! I processed all 795,348 people on your list and added the tag to all but 10 of them who I couldn't find. We did it!

...and they lived happily ever after
This play will be coming to Broadway next fall. Buy your tickets now.
What are some things you can do by bulk importing tags with the Reach API?
The Reach API provides endpoints covering many Reach features such as responses, user groups, survey questions, and tags. In this post, we’re focusing on tags. Even under the tags umbrella, there is one endpoint (update tag) that lets you directly add/remove a tag from up to 1000 voters at a time with a single request, and another endpoint (import tags) that lets you bulk apply a tag to more than 1000 voters by providing a link to a file with a list of voter IDs. We’ll focus on the Import Tags endpoint.
What are some reasons you might want to bulk apply tags to a large number of voters using the API?
- Universe Indicators: Maybe you have a pre-defined universe of priority targets. You can build that universe in another tool like VAN and then bulk-apply a tag in Reach so your users know which of the voters they’re reaching are your top priorities.
- Only Reachable By You: One clever tagging approach we’ve seen from some campaign is to identify voters without a good phone number or email address in VAN, and who fall outside likely door-knocking turf, and tag them as “Only Reachable by You” so their users know how important it is that they contact those folks.
- Absentee Ballot Tracking: Mark who has requested, received, or returned their Absentee ballot. This will help your users know who in their Network still needs an extra prompt and send messages that are relevant and helpful.
- Early Voting: Every night, during early voting, when your state reports which voters have voted early, you can use that list to mark those voters as having voted already in Reach.
- RCT Randomization: Are you running a Randomly Controlled Trial with Reach? You can use our API to tag voters as being in the control group or treatment group to make sure they are handled properly by your users.
Combining Bulk-Applied Manual Tags with Smart Tags
You can kick things up another notch by combining bulk-applied “manual” tags with our powerful smart tags. Smart tags can be shown on voters based on the presence or absence of certain manual tags! So, anyone who doesn’t have the manual tag “Already Voted” could automatically show with the smart tag “Not yet voted”. Anyone who doesn’t have the manual tag “Control” could automatically show with the smart tag “Treatment” or “Message me!”. Anyone who has the manual tag “AB Sent” but does not have the manual tag “AB Returned” could show with the smart tag “Waiting for AB Return”. You can even set some of your manual tags to be “inactive” in Reach so they don’t show up to users, but the smart tags based on them do, so the manual tags can serve as “behind the scenes” building blocks for smart tags. As you can see, by combining bulk-applied manual tags with smart tags, the possibilities are exciting. For more about smart tags, check out the Tags Admin Knowledge Base Article.
Step-by-Step Walk Through
Getting Started
There are a few things you’ll need in order to follow along with this post:
- A Reach Movement subscription. API access is only available on Movement plans. If you’re currently on Reach Complete or Reach Basics, email [email protected] and ask to upgrade.
- API Credentials. If you are a Reach Movement subscriber and you have not yet requested your API Credentials, please email [email protected] and we’ll provision your access.
- Be working on a computer. This work is not done from your phone and doesn’t use the Reach native app at all. In this example, we’ll be using a Mac, but Windows should work fine as well.
- Install a REST API Client application. This is a piece of software you’ll download and install on your computer that is designed to make it easy for you to communicate with APIs like Reach’s. In this example, we’ll be using an excellent API client for Mac called Paw so if you’d like to be able to follow these steps exactly and take advantage of the sample files we’ll provide, we suggest downloading Paw. If you don’t want to use Paw, another common choice is Postman which has similar features and also offers a free version.
Once you have all these pieces of the puzzle, you’re ready to begin:
Creating Your File
The way the Import Tags endpoint works is that you provide it with a URL to a publicly-accessible text file that contains the list of voters you want to apply a tag to. So before you can use the route, you’ll need to create this file. The file should be single-column text file, where each line in the file contains one Person ID. The Person ID can be Reach ID or any or the following as long as they are available in your campaign: State File ID, Voterfile VAN ID, DWID, Voterbase ID, or DNC Person ID. You can check which External IDs are available using the GET External IDs route. Each file may contain up to 1,000,000 rows and be up to 100MB in size. Any text-based file format should be supported including txt, csv, tsv, or others, as long as the file is encoded as ASCII or UTF-8. If the file is a csv, only the first column will be read. Compressed files are not supported.
Hosting your file
Now that you have the file, you’ll need to upload it to a location on the internet where you can generate a public link directly to the file. Keep in mind that many consumer-grade file-sharing tools like Google Drive and Dropbox do not usually allow you to generate URLS that link directly to an actual file. Usually, their “Generate Link” features point to a page where you can view the file or download it, but not a direct download link itself.
That said, there are many ways to host files with direct public links. One way is to use Amazon S3 or Google Cloud Storage which can generate signed public links to hosted files. Or you could even host the file on your own website or server.
One option that does allow you to create public links directly to Google Drive files is https://gdurl.com/ which can take a Google Drive link and convert it to a Download link like https://gdurl.com/5Gva/download which will work with the API. Keep in mind that this option is a bit hacky so your mileage may vary.
Setting up a webhook destination for callback notifications
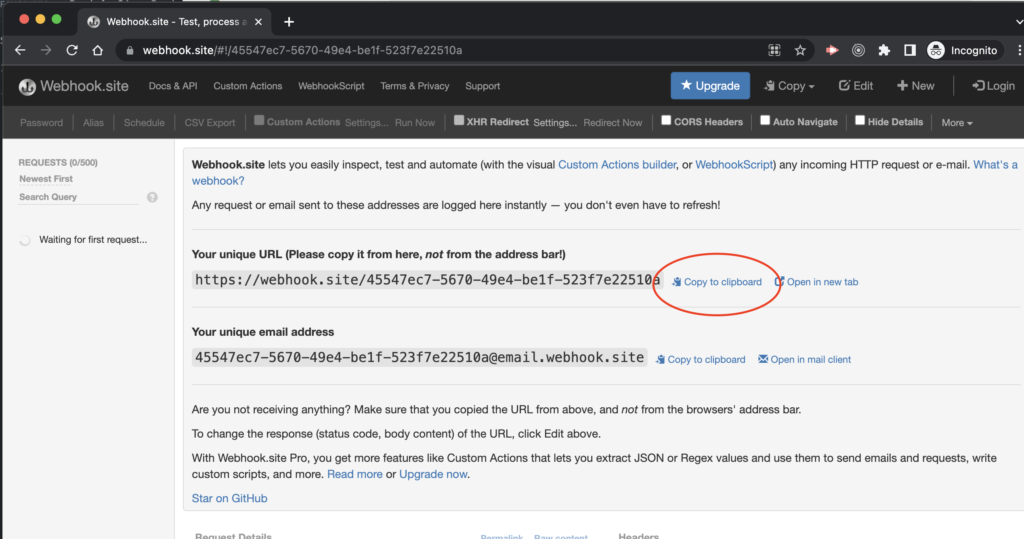
Large tag imports may take a long time. Sometimes over an hour. Once you have started a tag import, the API will provide you with a Job ID you can use to check on the status of the import, but if you want to be notified when it’s done, that is also possible using a technology called “Webhooks”. Without going into all the details, you can use a free service like https://webhook.site/ to receive this webhook from Reach. Simply go to that link and it will generate a new webhook unique URL for you. You can copy the URL using the button highlighted below. Leave that open in the background. You’ll need it later.
Setting up your API Client
Install Paw. Download our pre-configured Reach API Paw file here.
Note: If you’re using a client other the Paw, we do not provide a pre-built configuration file, but we do provide an OpenAPI spec JSON file which can be imported into many other clients, like Postman. You can download it from the top of our API Docs or just use this URL: https://api.reach.vote/openapi.json
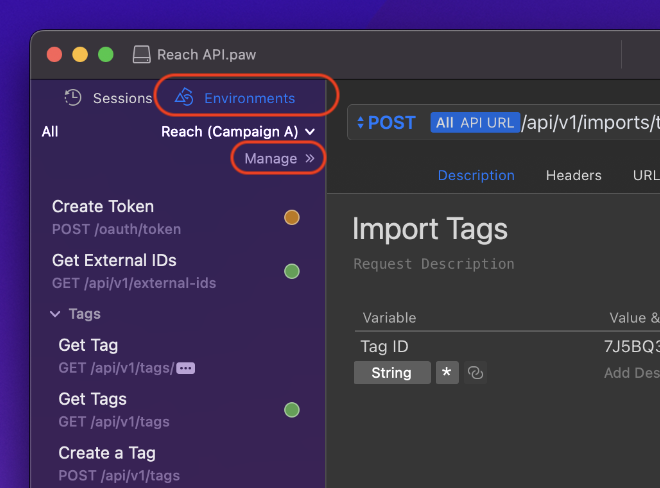
Assuming you’re continuing with Paw, open that config file in Paw and you should see a whole setup that is just about ready for you to use. The next thing you have to do is enter your own Reach API Credentials you received from Reach Support. Select the “Environments” tab in the top right of the Paw sidebar, then select “Manage”.
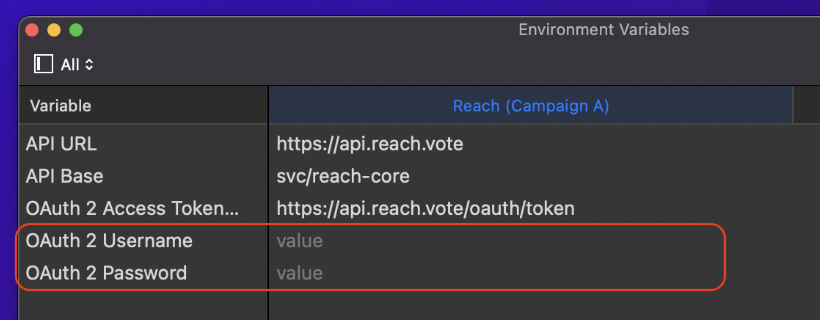
When the “Environment Variables” window pops up you’ll enter your username and password into the fields labeled “OAuth 2 Username” and “OAuth 2 Password” then close the window.
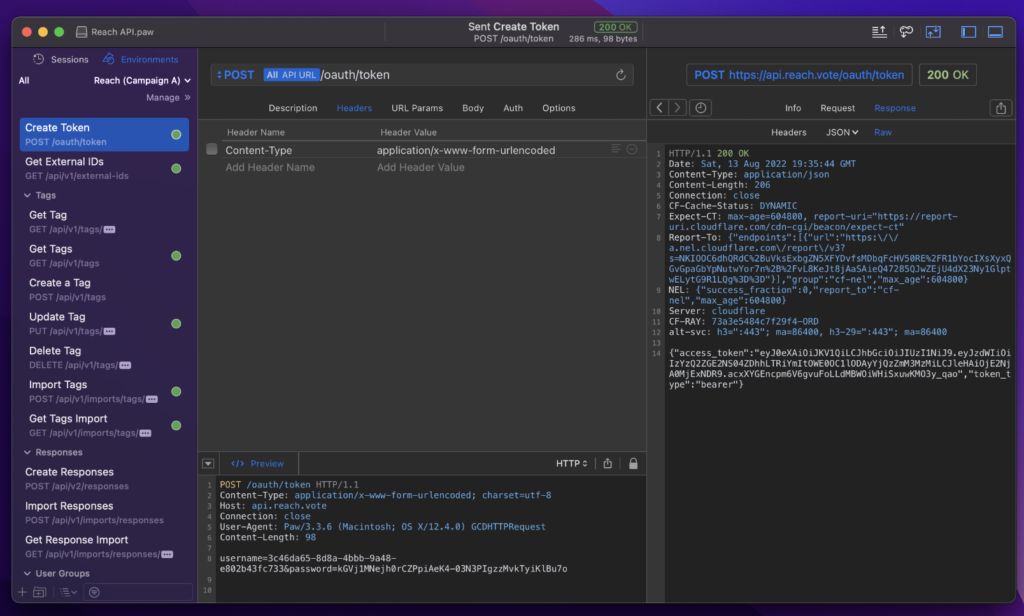
Once you have closed this window, you should be able to access and use the Reach API from Paw! To test it, you can select the “Create Token” request from the side bar and click command-Enter on your keyboard. That should send the request to the API asking for a token and if all worked well, you’ll see a green “200 OK” in the header and the Response pane in paw.
Now you need to set up your Tag Import request. Select “Import tags” from the sidebar. This is the type of request you want to make. The first thing you need to customize is on the description tab – it’s your Tag ID.
The Tag ID you enter here will determine which tag is going to be applied to your voters. You can use the Get Tags request to see all the tags in your campaign with their IDs. This will show tags you have made using the Reach Admin Dashboard and tags you have made using the API if you play around with the “Create a Tag” endpoint.
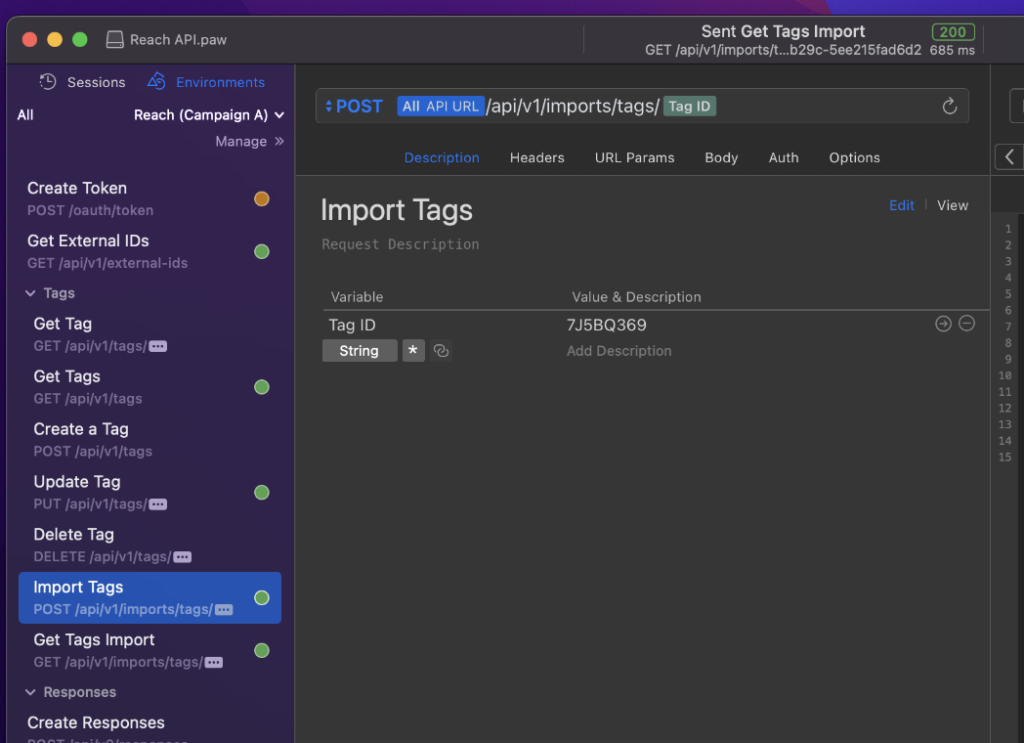
After you have entered the correct Tag ID, switch to the URL Params tab. Here is where you’ll enter in the Unique Webhook URL you generate at https://webhook.site/ earlier. If you don’t want a webhook notification when the job is complete, you can uncheck the “callback_url” field.

Now switch to the Body tab. This is where you’ll need to provide the public URL of your file you generated earlier and the person ID type you’re using in the file (like “Voterfile VAN ID”). You can also choose to provide an “action” of “remove” if you want the tag to be removed from the people in your file rather than added to them. And lastly, if you’re working on a multi-state campaign and you are using an ID which might not always be unique across states (like a State File ID) you may need to provide state.

Once you have the tag ID, webhook callback URL, and file URL set, you’re ready to go! Click command-Enter on your keyboard and the request to the API will be sent! If all goes well, you’ll see a “202 Accepted” status in the Exchange pane under the “Response” tab and a message saying “Your import is queued and will be processed in the order in which it was submitted.”

We do process imported in the order in which they were received so if it’s a very busy time, your import may remain pending for a while until we have capacity to process it. If you want to check the status of your import, switch to the “Get Tags Import” request in the sidebar and click Command-Enter. You should not need to change anything on this one. It will return the import’s current status, so once it is running, you’ll see a status of “Import is in progress” until the import is complete.
Note that the counts of total_rows, failed_rows, and success_rows will increase as the import proceeds. When the import is complete, if you check again by submitting the request again, you’ll see a status of “completed” also get an error_log URL where you can download a file listing any rows that failed so you can look into it.
Meanwhile, if you keep an eye on your webhook.site page you had in the background, it will automatically pop up a new entry in its sidebar when your import is complete:
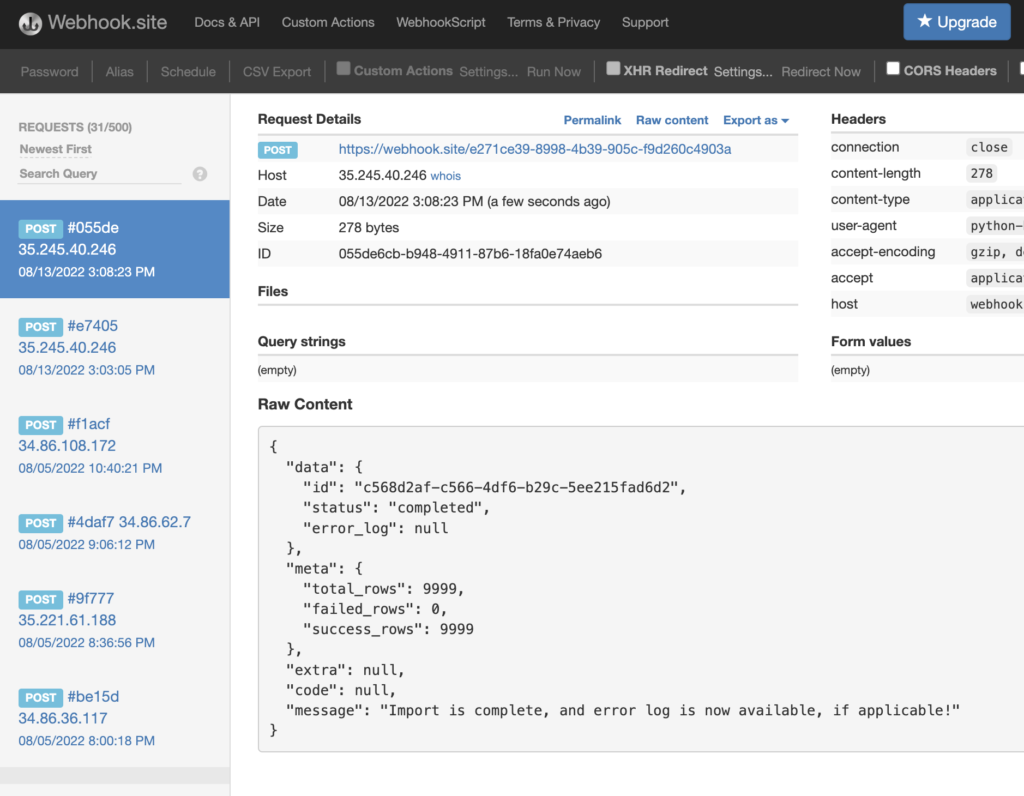
And now your tags are live in Reach! You did it! Now that you’re set up with the API in Paw, feel free to play around with other endpoints and features too!
Happy Reaching!


